Step-by-step guide on how to create custom bundles in Shopify [Updated, 2024]
Nowadays, there exists numerous ways to grow your brand in Shopify. Most of these ways include installing some sort of an app, that can help you sell more products and result in better customer satisfaction.
One of the most efficient strategies is promoting your products. You can promote your products on many pages of your store. However there is even a step further than that. What if you could combine products together and promote more than just one product in one place? Well we are glad to tell you that something like this is completely possible with bundles. Bundles allow you to combine products (to bundle them up) and sell them together, to give your customers benefits. Most popular benefits that you can give to customers via bundles are discounts.
This way of course, is not only beneficial to your customers, but also to you, as a merchant. By combining complementary products or products that did not sell well before with popular products, you can easily sell more products and increase the revenue of your store.
However, while creating bundles is a very simple process, understanding the customization of bundles is an important way that can help you sell more products and just overall help your brand.
In this article we will first explore how to get started with bundles in Shopify, and later we will show you how you can use various strategies to create appealing bundles to your customers while still improving the sales of your brand.
How to get started with bundles
Installing Bundler app
The first step is to install the app that can enable you to create bundles in your store. While there exist a variety of different bundling apps, the one app stands out from the rest and it features many functionalities that other bundling apps don't have. And it even comes with a completely free plan, in which you can create unlimited bundles. Of course, we are talking about best Shopify bundle app - Bundler - Product bundles.
Creating your first bundle
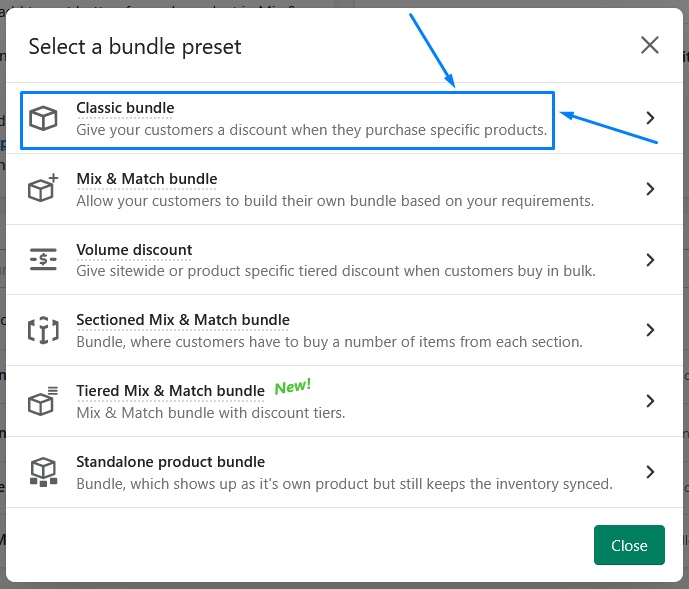
Once you installed the app, you can start creating the bundles. In Bundler, there exists many different types of bundles that you can create. This way the whole process is completely up to you and you can really customize your bundles in many different ways. However for now, lets keep it at a classic bundle. This is the most basic type and it will allow you to define which products you want to bundle together in a bundle and setup a discount. Then, the customer will simply see the bundle and decide if they want to purchase it or not.
You can create a classic bundle by going to Bundler → Create bundle → Classic bundle
Define the properties of your bundle
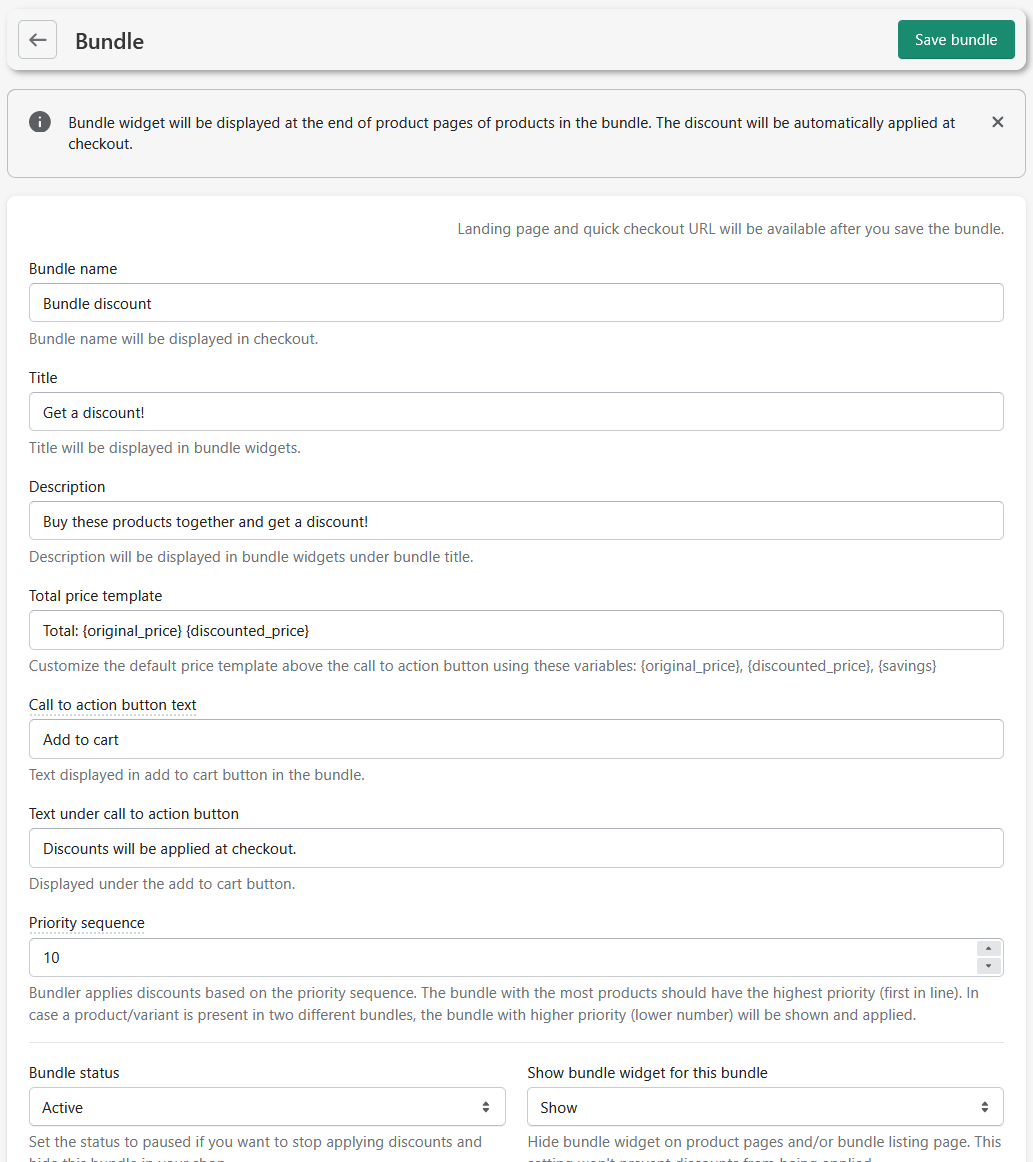
When you are in the bundle creation page, you need to input some information about your bundle to set it up correctly. This includes:
- Inputting the bundle name, title, description, …
- Setting up discounts. There are more than just one way of setting up discounts. For example you could do percentage discounts, which is applied to each product in the bundle, you can do the fixed amount discount, which is proportionally divided between bundled products, etc…
- Setting up bundle product level. This means that you can define products in your bundle under product level or variant level. Variant level means that the variants of the product will be shown as standalone products in a bundle,
- Picking the products for the bundle. Obviously the main step is to decide and select whichever products you would like to have in a bundle. You can even check the option for the app to automatically add new product variants when you create them.
View your bundle
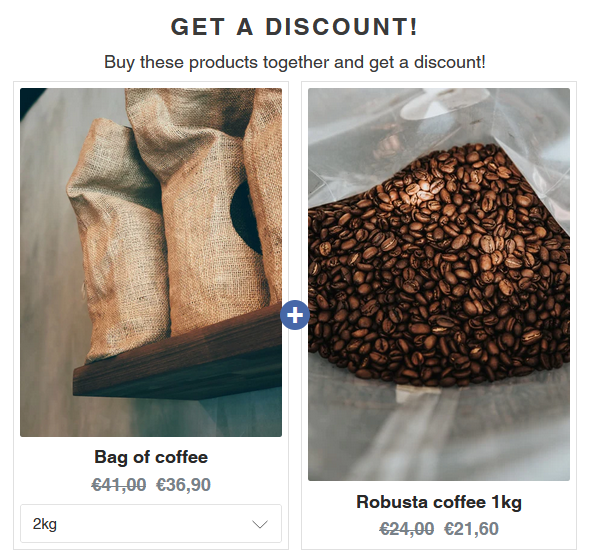
Once you save your first bundle, you are ready to go! You bundle should automatically appear on the product pages of the products that you included in the bundle. However, you will later see that this is not the only way of displaying the bundles in your store.
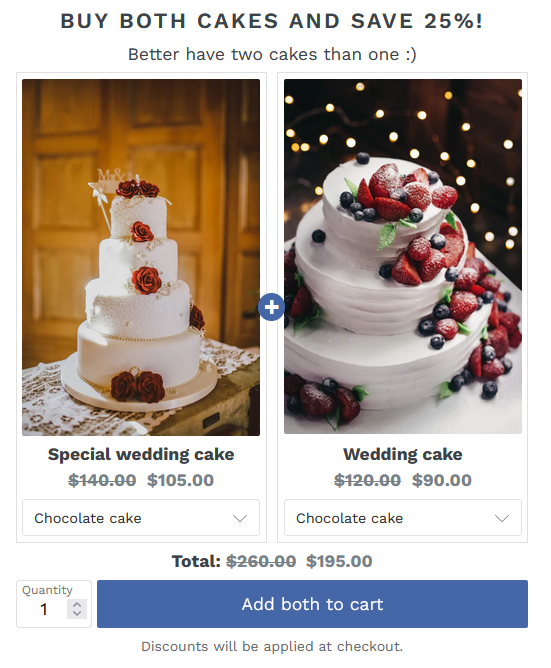
As you can see, the bundle on the image shows two products. Customer has a dropdown menu under each of the product in the bundle, where they can pick a variant of each product individually. Of course, the variants that they can pick from can also be defined by you. Under bundle you can see the discount of the bundle and an add to cart button, if customer decides to proceed to buy the bundle.
Bundle customization in Shopify
Now that you know the basics of bundle creation in Shopify, let's show you everything that you can do with bundles. You will quickly see that there are many different things you can do with bundles, from different bundle types, to changing the look of the bundle, to enabling/disabling some functions, there's just a lot that is possible, especially with Bundler.
Bundle types
As mentioned, the classic bundle is only one of the different types that you can use. Bundler offers 5 different bundle types that you can create and use in your store. Each of them gives your customers different touch and different shopping experience, so make sure you go through every type and pick the one that would fit your needs!
If you have in mind a bundle, where customers can customize their bundle and make their own, check out the mix & match bundle on this article or check out this article, where we show you exactly how you can set up the mix & match bundle in Bundler.
Classic bundle
The one we mentioned until now. Basic bundle where you simply define which products would you like to put together and then all the customers do is decide if they would like to purchase it or not.
Mix & Match bundle
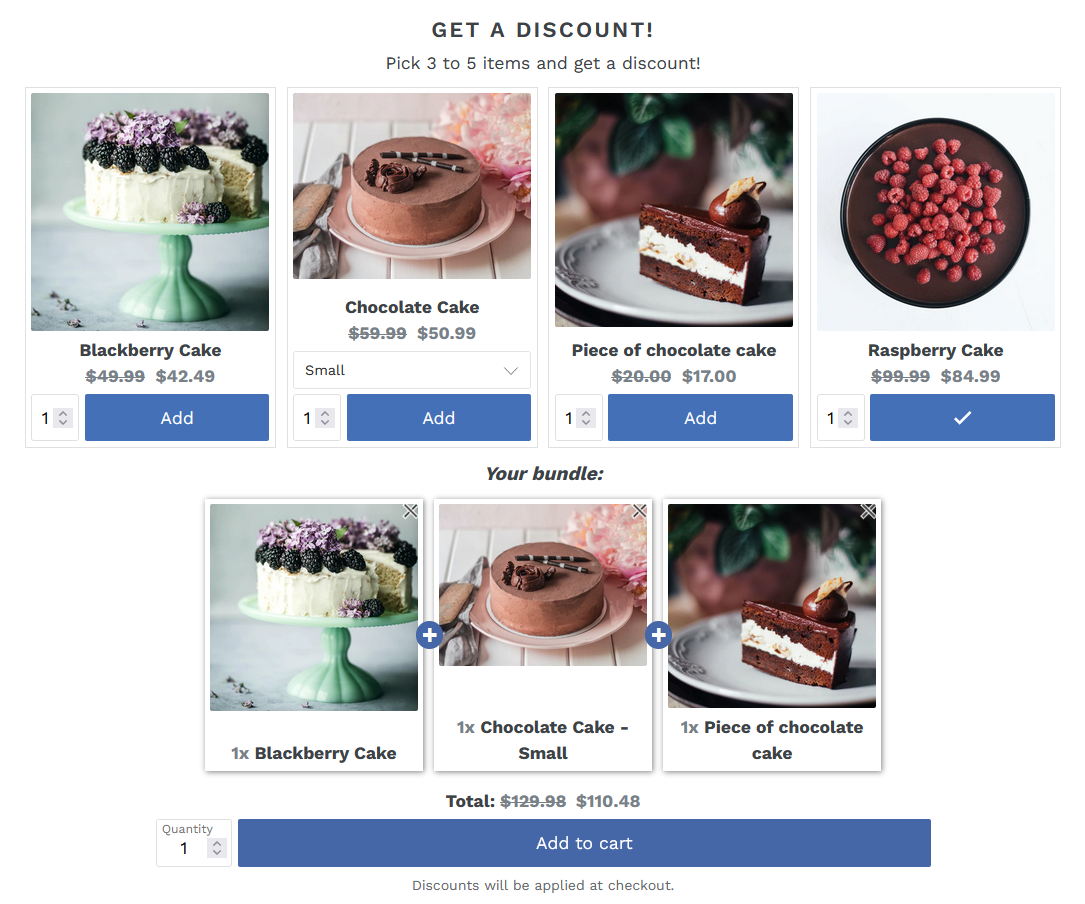
This type is very interesting and its getting more popular with recent months. Unlike classic bundle, customers can build their own bundle here based on your requirements while still getting discounts. Basically you first pick a selection of products that you would like your customers to build their own bundle from. This can be from 5 to 15, to however many products you would like, however its recommended not to pick too many to not overwhelm the customer. Then, you pick the minimum amount of products you would like the customer to buy from the selection and the maximum number of bundle items customer can purchase and still get a discount.
Mix & match bundles can be a great addition to your store, since it gives your customer more freedom and a potentially better shopping experience. This option is also great if you are not sure which products should you put together to create classic bundles, so you can just pick as many as you want here, and then see which products together are getting selected the most by your customers.
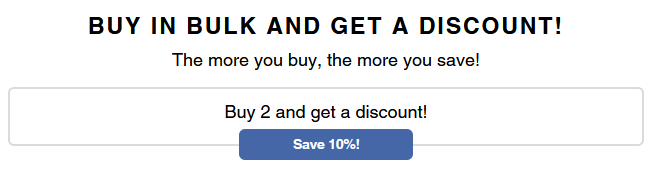
Volume discount
While this one does not have a typical bundle widget like the two types mentioned above, it can be very useful. Volume discounts allow you to offer your customers a sitewide or product specific tiered discount when customers buy in bulk. This bundle type is perfect if you would like to have “Buy X get Y off” offers in your store. The widget of volume discounts does not show the actual products included in the bundle (since the condition applies to any product in your store). When you are setting up this type of bundle, you have two options. You can either pick the sitewide option (the most popular one), which means that the rules will be applied to all products in your store, or you can pick the product specific option, which means that you will pick the products that you wish to have a volume discount available.
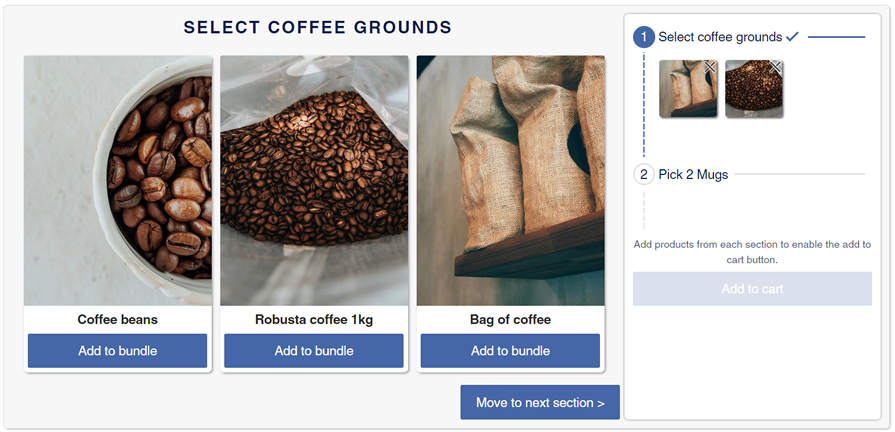
Sectioned mix & match bundle
An upgrade of the mix & match bundle mentioned above are sectioned mix & match bundles. This one works very similar to the normal mix & match bundle, except that its further divided into sections. This means that instead of customers buying certain amount of products from the whole selection, they instead pick a number of items from each section, that you define. Instead of seeing all the products at once, they will first go through first section, pick products from there, then go to second section, pick products from there, and so on. When you are creating sections, you can give each section a name, description and minimum/maximum quantity of products that can be selected from it.
Tiered mix & match bundle
Another variation of mix & match bundle is a tiered mix & match bundle. The concept is basically the same, except that when customers are adding the products from the selection to the bundle, they will se a message telling them how many more products they need to add in order to get an additional discount. Basically it works on the concept of discount tiers. You can define different tiers and then customers can reach those discounts if they add more products from the bundle.
Functionality settings in Bundler
Let's show you just how much you can customize your bundles and enable or disable a bunch of different features. Creating bundles with Bundler really is a very flexible thing to do, so if you are aware of these settings then you can completely customize the bundle experience for your store as you think its best for your store. Here are some of the settings that can enhance the bundling experience for your store:
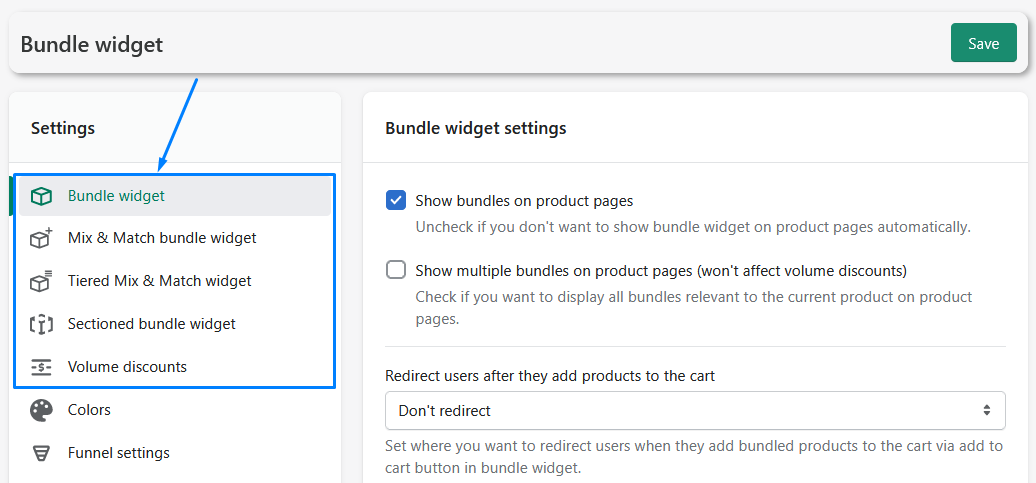
Enabling features in widgets. There are a variety of settings for the bundle widgets itself, such as showing product prices, showing compare at price as base price, show unit price, animating add to cart button, separate variant options, using retina images, and many more. You can find the settings that are related to widgets by going to Bundler → Settings → Bundle widget,
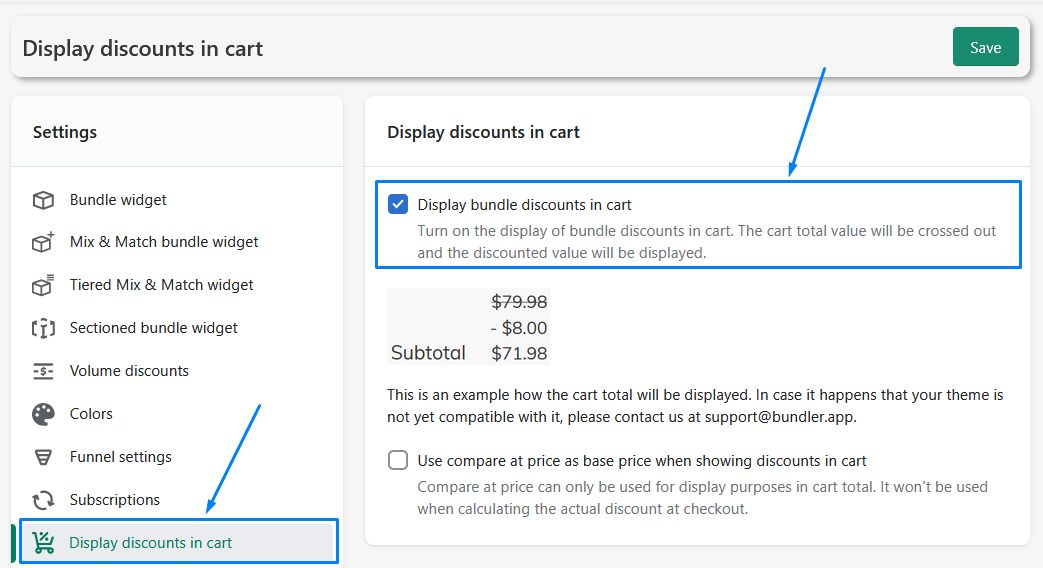
Displaying discounts in cart. By default, the final bundle discount that is being applied is only shown under the bundle and in the checkout. A great option is, if you want to display the discounts in the cart. That is of course possible with Bundler. By going to Bundler → Settings → Display discounts in cart, you can enable this and then the cart total value will be crossed out and the discounted value will be displayed.
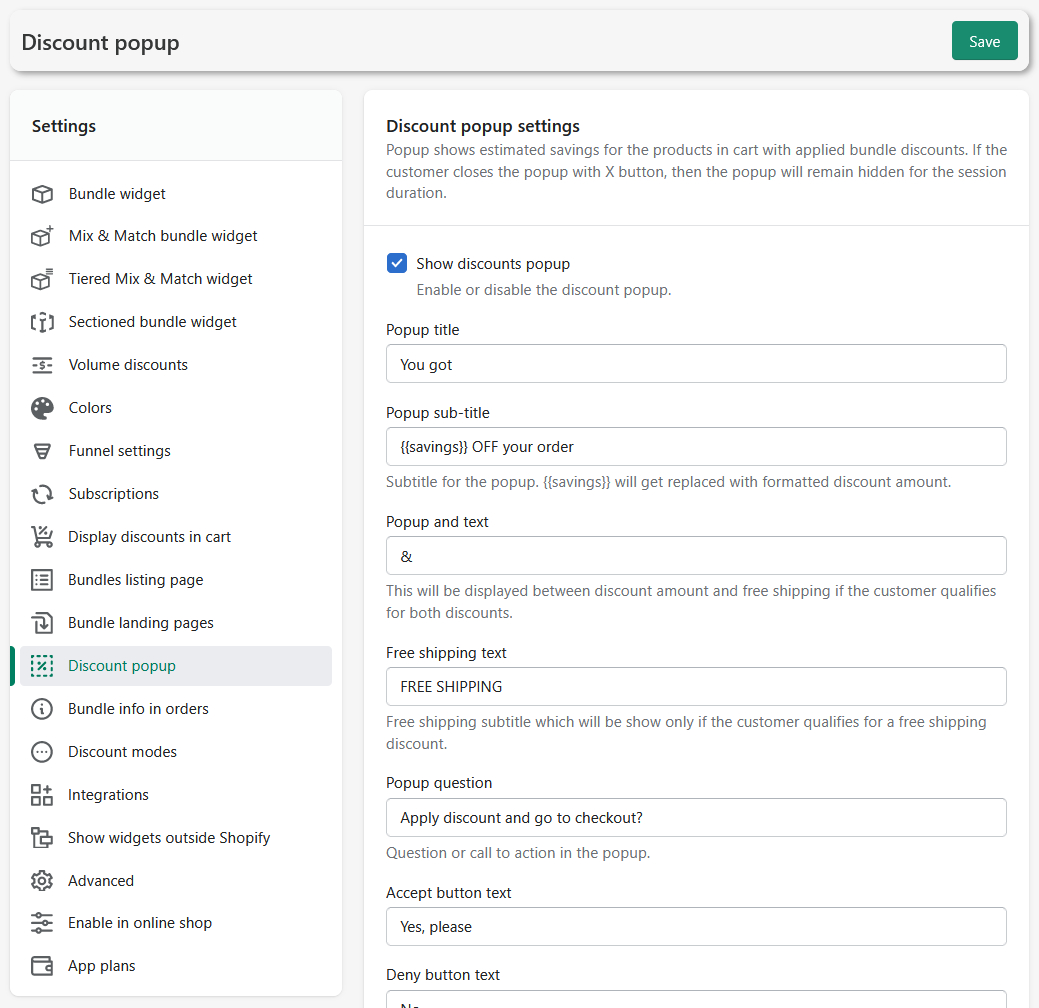
Customizing the discount popup. Discount popup shows estimated savings for the products in the cart with applied bundle discounts. This discount popup is also heavily customizable and you can change it as you want. If you want, you can even disable it, however majority of customizable settings here involve changing the texts in the popup such as the popup title, the free shipping text, the popup question, and more!
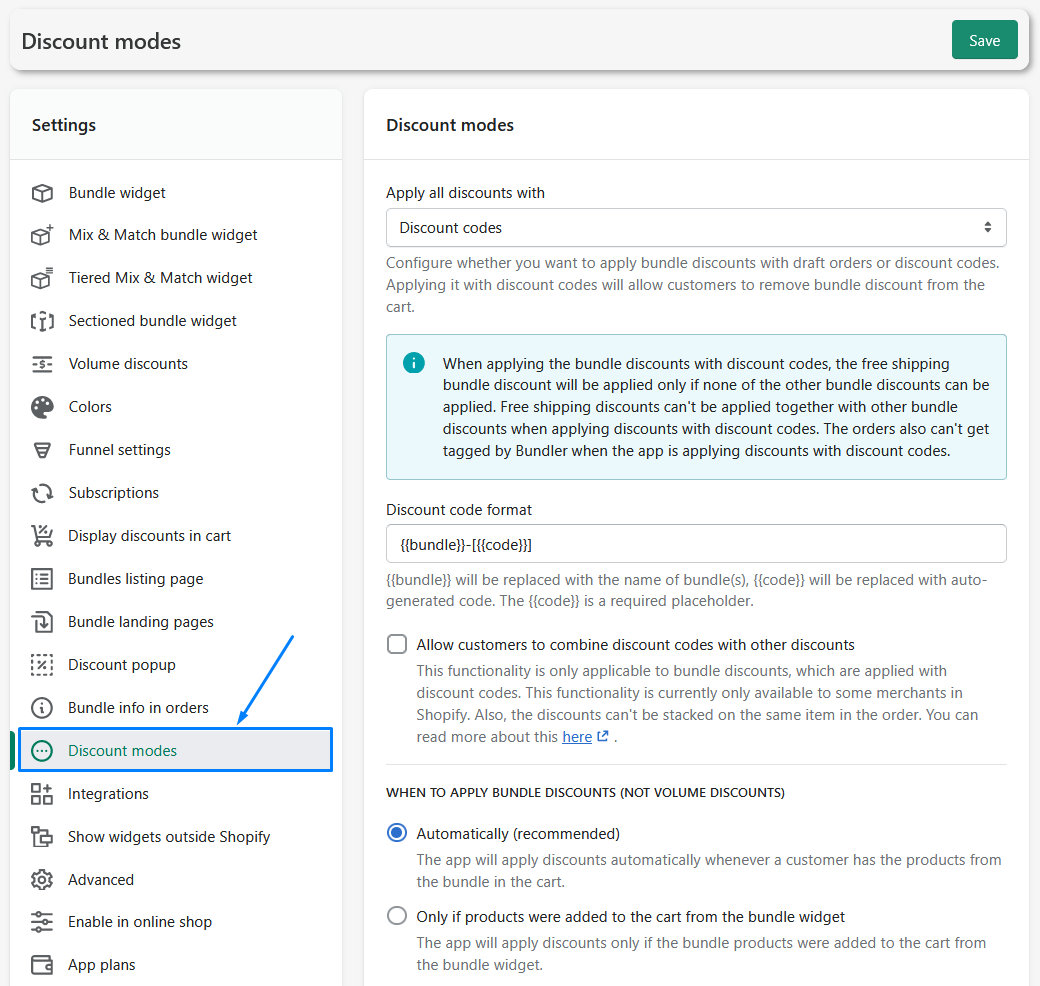
Discount modes is another great setting where you can change to how you want to apply bundle discounts. You can either pick the draft orders (which is the recommended way) or discount codes which will allow customers to remove the bundle discount from the cart. There is also a setting that you can change about when do you want to apply bundle discounts, such as automatically, or only if products were added to the cart from the bundle widget.
Colors & look customization settings
Of course, when mentioning customization, a lot of people think of how flexible the customization options about the whole look of the widget are. From changing colors, to changing texts, basically customization options are infinite with Bundler. Lets show you just what you can change to make the app look fitting with your brand and so you customers will be more engaged with the products which can lead to higher revenue.
Lets look at some of the look customization settings available in Bundler:
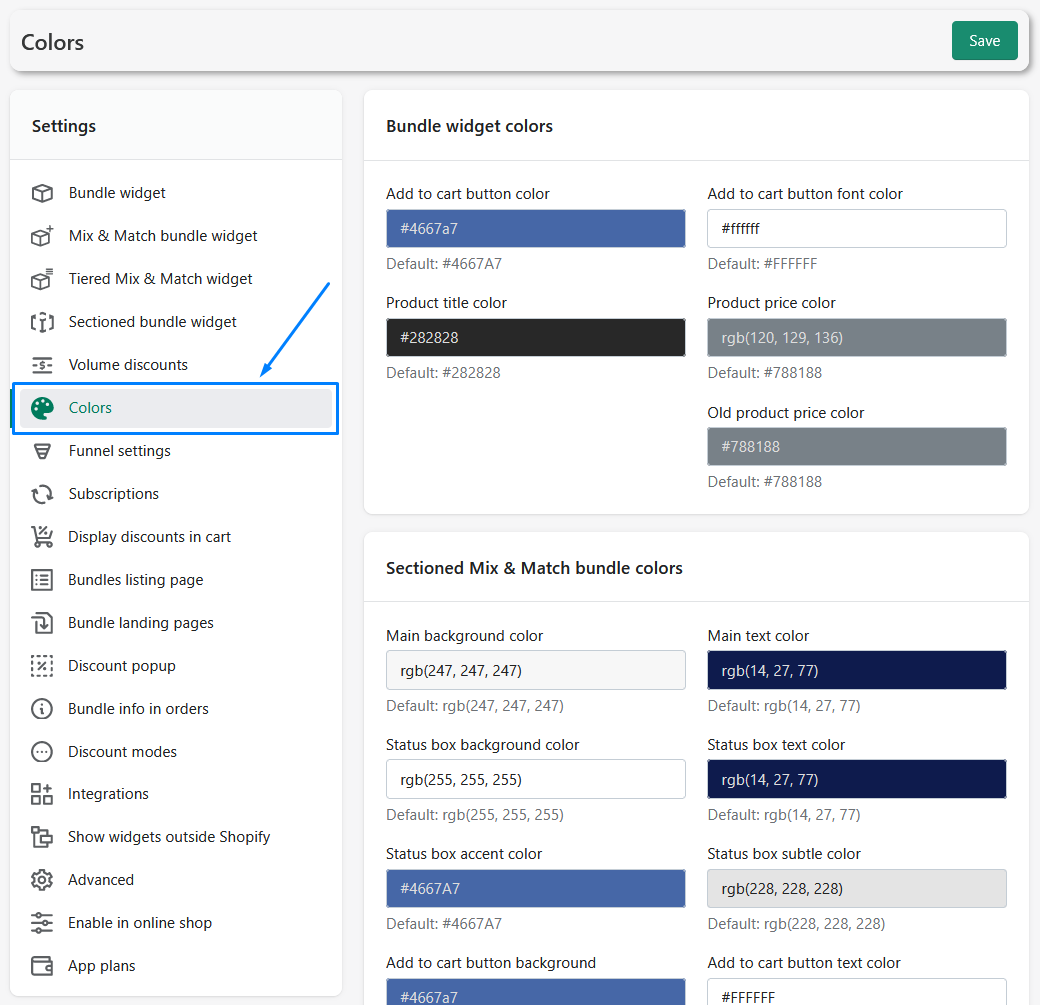
Colors. You can basically change the colors for everything in Bundler app. In bundle widget, you can change the colors of buttons, price colors, font colors, background colors, border colors, label colors, etc… All color-related settings can be accessible by going to Bundler → Settings → Colors
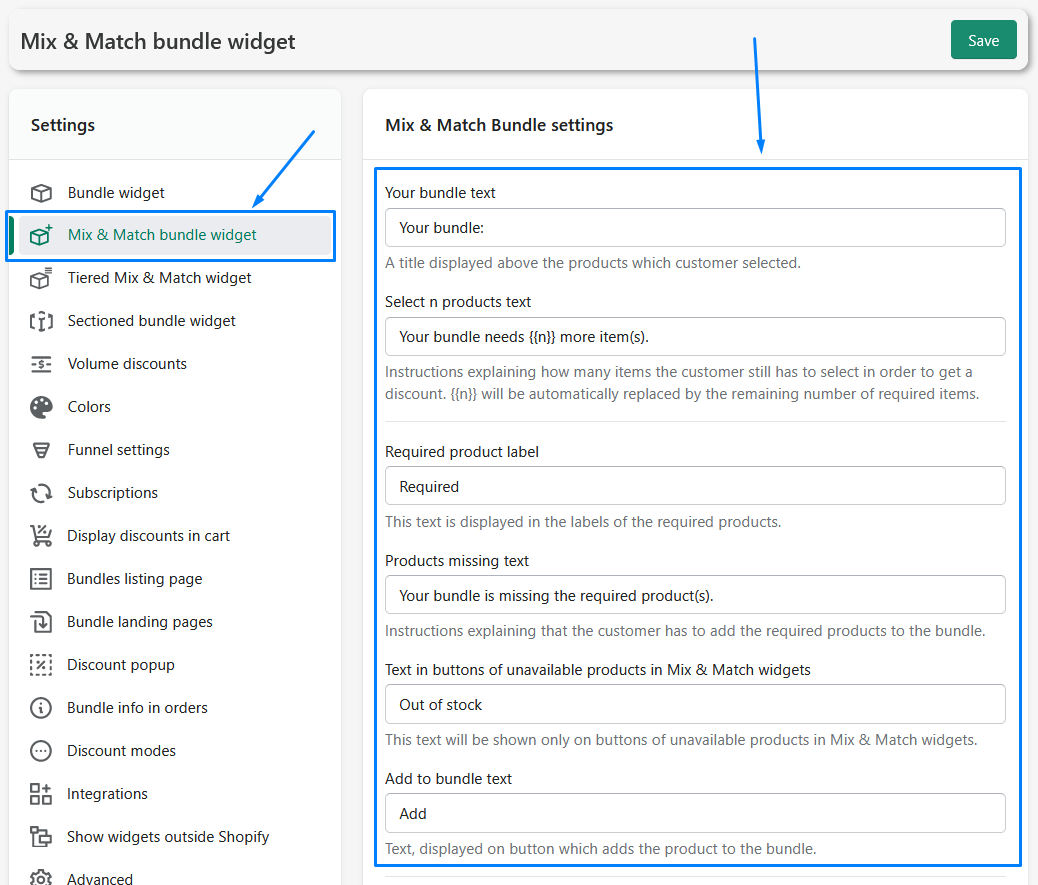
Changing texts. Just like with colors, you can also change any text in the widget that you want. Popular texts include out of stock label, quantity label, bundle text, add items label, and more. You can find the majority of text settings by going to Bundler → Settings and then click on bundle widget, mix & match bundle widget, or anything else, depending on where do you want to change your text.
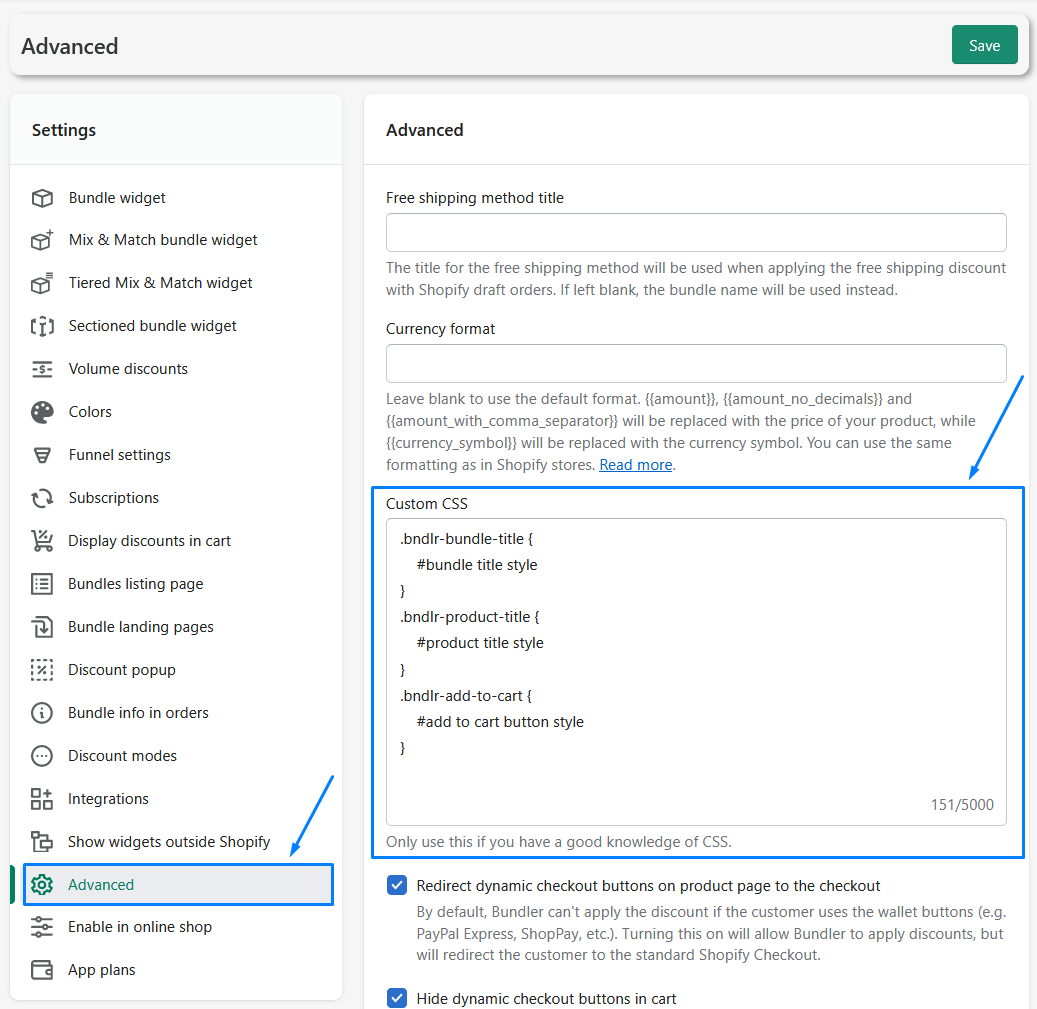
Advanced customization. Customization can have unlimited possibilities if you have one thing. Coding knowledge. Bundler supports custom CSS, so if you have some CSS knowledge you can completely customize the whole look of the widget, You can use the CSS by going to Bundler → Settings → Advanced → Custom CSS
Conclusion
As you can tell, there are a bunch of flexible settings regarding customization with bundles, especially with the best bundles app Shopify Bundler. From changing the colors, to changing the text, you can easily change the look of the widget to be fitting with your brand and shop. And if we are speaking about customization from the customers perspective, you can make the mentioned mix & match bundle where your customers can make their own bundle based on your requirements.
We hope this article gave you some ideas on how you can increase the bundles in your shop, or even start using them, if you didn't yet.
Happy bundling! :)